Arduino Controlled Power Strip.
After having the cisco lab online for a bit, I didn’t realize that it would more than double my power bill. Looking for a way to turn it off remotely and I got the idea from a colleague to make my own with Arduino and he helped put it together.
Next time I should take some progress pictures.
Instead As a summary:
- Unsoldered the switch
- Used a multimeter to test which 2 sections of the board completes the circuit.
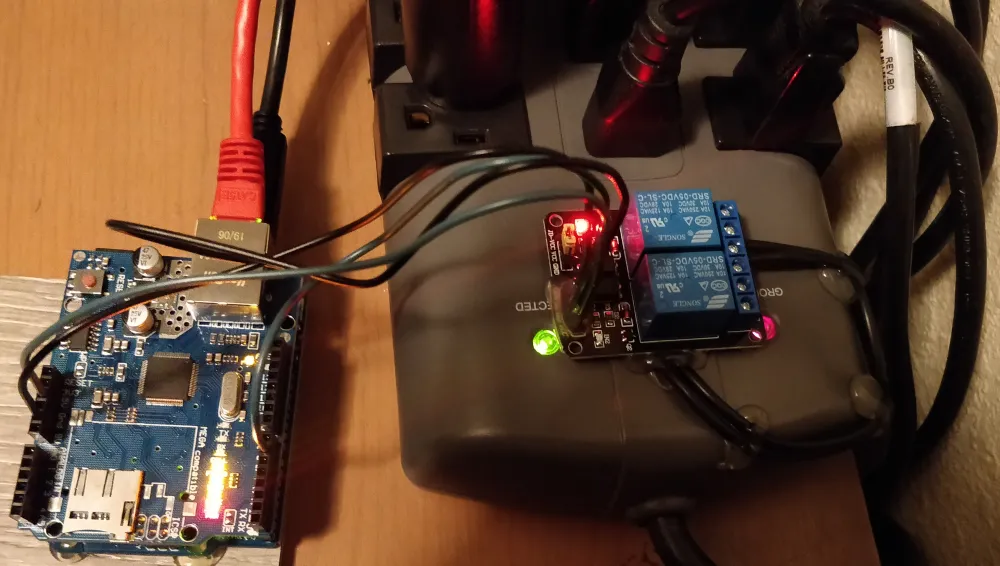
- Soldered 2 wires to the internal board
- Connect those to the relay board and attach both to the power strip.
- wire up the Arduino to the relay and finish coding the Arduino.
I wanted the circuit normally open since it will be off most of the time. Then the relay can close and complete the circuit when I remotely turn it on.
To turn it on I just open a new tab and go to http://ipAddress/$1
To turn it of I just open a new tab and go to http://ipAddress/$0
I’m not sure why a new tab has to be used and why text based browsers like Lynx or Curl don’t work. I guess that is for a future update when I have time.
I did wait until the weekend to test it because I was paranoid that it would do something unexpected or catch on fire while I wasn’t home.
Update: It has had no problems and has been stable and I’ve been using it for a few weeks now as of October 9th.
Here is my Arduino Code
#include <SPI.h>
#include <Ethernet.h>

boolean incoming = 0;
int PowerRelayK1 = 6;

byte mac[] = { 0x02, 0x02, 0x02, 0x00, 0x00, 0x01 };
byte ip[] = { 10, 3, 72, 98 };
byte gateway[] = { 10, 3, 72, 254 };
byte subnet[] = { 255, 255, 252, 0 };

EthernetServer server = EthernetServer(80);

void setup()
{
  Serial.begin(9600);
  Serial.print("Power is on ");
  pinMode(PowerRelayK1, OUTPUT);
  digitalWrite(PowerRelayK1,HIGH);
  Serial.print("Relay output set");

   // initialize the ethernet device
  Ethernet.begin(mac, ip, gateway, subnet);
  Serial.print("network is on");
  /*start the Ethernet connection and get an IP via DHCP:
  Serial.println("Initialize Ethernet with DHCP:");
  if (Ethernet.begin(mac,ip) == 0) {
    Serial.println("Failed to configure Ethernet using DHCP");
    if (Ethernet.hardwareStatus() == EthernetNoHardware) {
      Serial.println("Ethernet shield was not found.  Sorry, can't run without hardware. :(");
    } else if (Ethernet.linkStatus() == LinkOFF) {
      Serial.println("Ethernet cable is not connected.");
    }
    // no point in carrying on, so do nothing forevermore:
    while (true) {
      delay(1);
    }
  }
  // print your local IP address:
  //Serial.print("My IP address: ");
  //Serial.println(Ethernet.localIP());
  */
  Serial.print("My IP address: ");
  Serial.println(Ethernet.localIP());
  server.begin();

}

void loop()
{
  EthernetClient client = server.available();
  if (client) {
    // an http request ends with a blank line
    boolean currentLineIsBlank = true;
    while (client.connected()) {
      if (client.available()) {
        char c = client.read();
        // if you've gotten to the end of the line (received a newline
        // character) and the line is blank, the http request has ended,
        // so you can send a reply

        //reads URL string from $ to first blank space
        if(incoming && c == ' '){
          incoming = 0;
        }
        if(c == '$'){
          incoming = 1;
        }

        //Checks for the URL string $1 or $0
        if(incoming == 1){
          //Serial.print("debugging c value is: ");
          //Serial.println(c);

          if(c == '0'){
            digitalWrite(PowerRelayK1,HIGH);
            client.println("HTTP/1.1 200 OK");
            client.println("Content-Type: text/html");
            client.println();
            client.println("<cke:html><cke:body bgcolor=#FFFFFF>RELAY IS OFF!</cke:body></cke:html>");
          }
          if(c == '1'){
            digitalWrite(PowerRelayK1,LOW);
            client.println("HTTP/1.1 200 OK");
            client.println("Content-Type: text/html");
            client.println();
            client.println("<cke:html><cke:body bgcolor=#FFFFFF>RELAY IS ON!</cke:body></cke:html>");
          }
        }

        if (c == '\n') {
          // you're starting a new line
          currentLineIsBlank = true;
        }
        else if (c != '\r') {
          // you've gotten a character on the current line
          currentLineIsBlank = false;
        }
      }
    }
    // give the web browser time to receive the data
    delay(1);
    //Serial.println(digitalRead(7));
    // close the connection:
    client.stop();
  }


/*---Ethernet DHCP Renawal Code Starts Here------------------------------------------------------
  switch (Ethernet.maintain()) {
    case 1:
      //renewed fail
      //Serial.println("Error: renewed fail");
      break;

    case 2:
      //renewed success
      //Serial.println("Renewed success");
      //print your local IP address:
      //Serial.print("My IP address: ");
      //Serial.println(Ethernet.localIP());
      break;

    case 3:
      //rebind fail
      //Serial.println("Error: rebind fail");
      break;

    case 4:
      //rebind success
      //Serial.println("Rebind success");
      //print your local IP address:
      //Serial.print("My IP address: ");
      //Serial.println(Ethernet.localIP());
      break;

    default:
      //nothing happened
      break;
  }
*/
//---Ethernet DHCP Renawal Code Ends Here--------------------------------------------------------

}
Here are some of the useful sources I found along the way.
https://www.digikey.com/en/maker/blogs/2018/how-to-get-started-with-arduino
https://www.instructables.com/id/Arduino-Ethernet-Shield-Tutorial/
https://codebender.cc/sketch:1138#Web%20Server.ino
https://www.arduino.cc/reference/en/language/functions/digital-io/digitalread/
http://www.circuitbasics.com/setting-up-a-5v-relay-on-the-arduino/
https://randomnerdtutorials.com/guide-for-relay-module-with-arduino/
https://upload.wikimedia.org/wikipedia/commons/c/c9/Pinout_of_ARDUINO_Board_and_ATMega328PU.svg